

View all posts

How to resell WHM/cPanel, Plesk and Windows
Reseller hosting refers to the practice of selling website space to other users. Resellers will purchase an amount of disk space and bandwidth from a service provider, such as ourselves. Typically, this will be at a reduced wholesale price, so that they can make a profit. It is then typically sold as part of a package, along with email services, by the reseller.
Essentially, the reseller becomes the hosting provider for their own customers. These resellers will often promote themselves as hosting providers. QuickHostUK, for example, offers their resellers the ability to rebrand the Plesk and cPanel control panels, which is known as white label hosting. To provide the best user experience, we only use industry-leading panels, cPanel & Plesk.
The reseller is responsible for administrating the customer’s websites. However, since QuickHostUK offers Fully Managed Reseller Hosting, resellers can simply raise a ticket with our support team and we’ll take care of any issues.
QuickHostUK provides reseller hosting to all sizes of businesses, from freelance web designers to web design agencies and other hosting providers.
Getting started
First, head on over to our Fully Managed UK Reseller Hosting page and Configure your package.
On the next page you can choose from the following options:
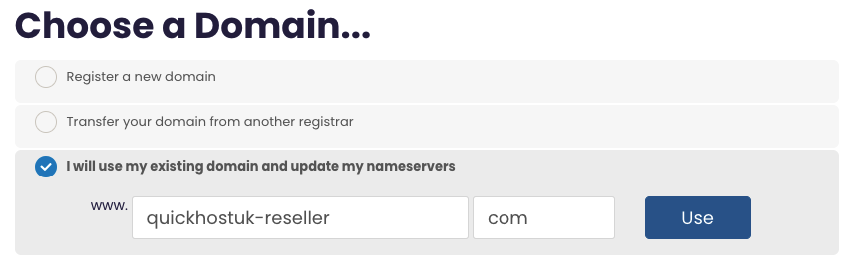
The options and explanations are:
- Register a new domain
This will allow you to register a new domain for your reseller package. - Transfer your domain from another registrar
This will allow you to transfer in a domain to use with your reseller package from another provider. - I will use my existing domain and update my nameservers
This will allow you to use an existing domain without moving it to us.
For this example, we’re going to use our existing domain quickhostuk-reseller.com and simply update its name servers. Our name servers are provided in your welcome email, or you can use your own custom name servers.
Follow the on-screen instructions to complete the checkout process.
WHM/cPanel
Once complete, click Services > WHM/cPanel Reseller Unlimited > Login to WHM

Next, we need to create a web hosting package to give to our customers. You can create as many packages as you need. Click Add a Package:

On this page we can set the package limits:
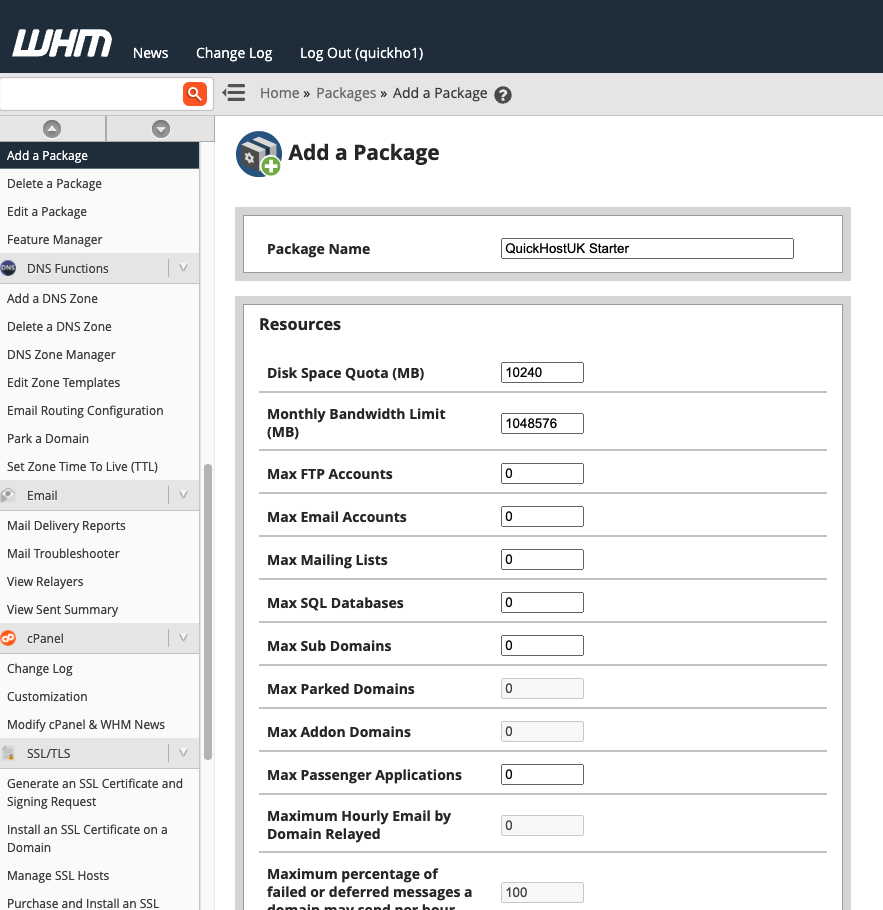
The available options are:
- Resources
- Disk Space Quota (MB)
- Monthly Bandwidth Limit (MB)
- Max FTP Accounts
- Max Email Accounts
- Max Mailing Lists
- Max SQL Databases
- Max Sub Domains
- Max Parked Domains
- Max Addon Domains
- Max Passenger Applications
- Maximum Hourly Email by Domain Relayed
- Maximum percentage of failed or deferred messages a domain may send per hour
- Max Quota per Email Address (MB)
Simply repeat the process for each package you want. When you have created your package(s), click the WHM logo to return to the home page.
Now we can create a cPanel web hosting account. Click Create a New Account

Enter all the needed detail for the account, such as domain name, password, and the account holders email address:
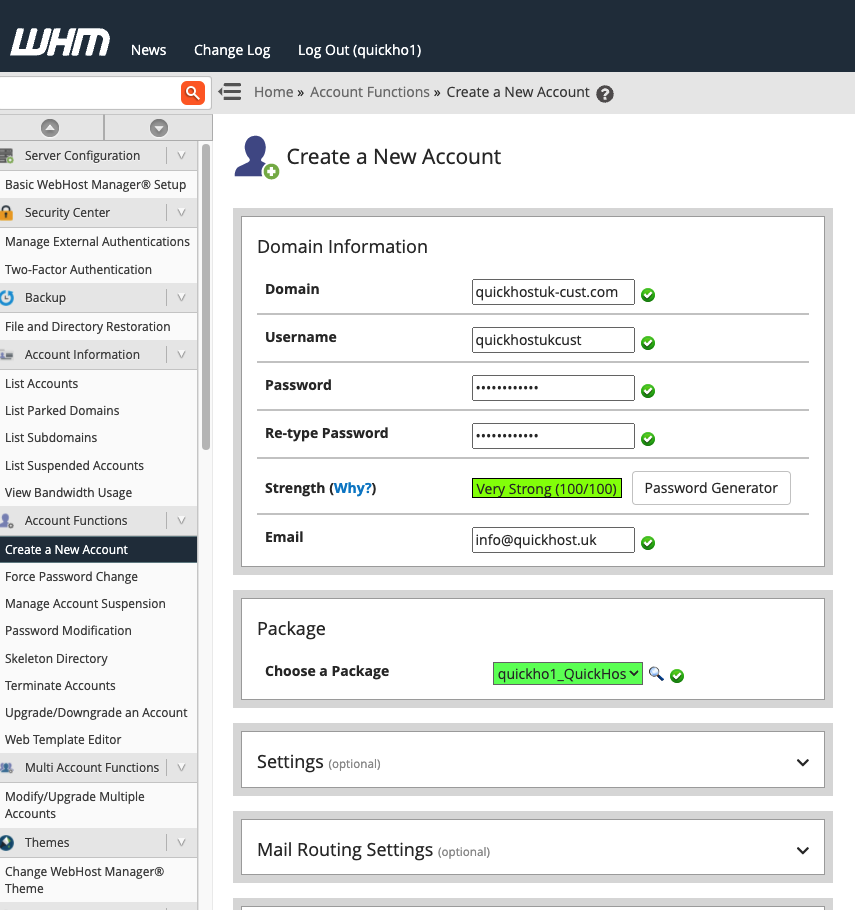
The available options are:
- Domain Information
- Domain
- Username
- Password
- Package
- Choose a Package (the one we just made)
- Settings (optional)
- CGI Access
- Locale (English)
- Enable Apache SpamAssassin
- Enable Spam Box
- Mail Routing Settings (optional)
- Automatically Detect Configuration (recommended)
- Local Mail Exchanger
- Backup Mail Exchanger
- Remote Mail Exchanger
- DNS Settings (optional)
- Enable DKIM on this account.
- Enable SPF on this account.
- Use the nameservers specified at the Domain’s Registrar. (Ignore locally specified nameservers.)
- Nameservers: ns1.quickhostuk-reseller.com / ns2.quickhostuk-reseller.com
Once you’re ready, click Create and the cPanel account will be created.
You can now provide the details to your customer so they can log in to cPanel.
Here’s an example output.
Account Creation Status: ok (Account Creation Ok)

+===================================+
| New Account Info                  |
+===================================+
| Domain: quickhostuk-cust.com
| Ip: 1.2.3.4 (n)
| HasCgi: y
| UserName: quickhostukcust
| PassWord: _wYJHhjjqt*75M
| CpanelMod: paper_lantern
| HomeRoot: /home
| Quota: 10 GB
| NameServer1: ns1.quickhostuk-reseller.com
| NameServer2: ns2.quickhostuk-reseller.com
| Contact Email: info@quickhost.uk
| Package: quickho1_QuickHostUK Starter
| Feature List: default
| Account Enhancements: None
| Language: en
+===================================+
When you are ready, click the WHM logo to return to the home page.
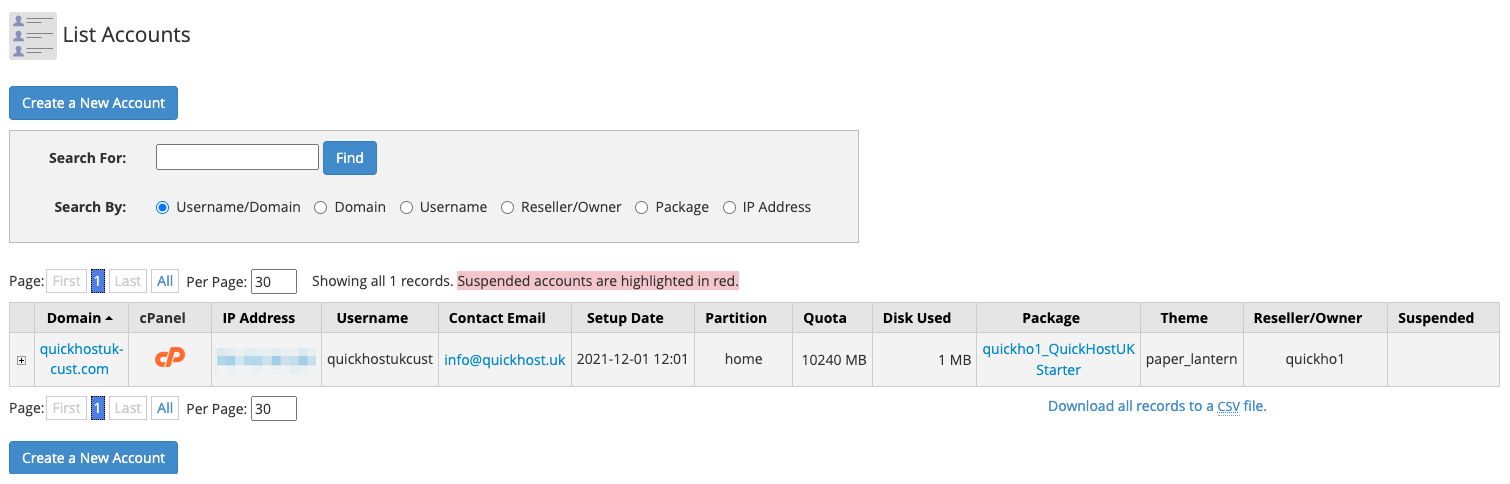
Now we can see our new cPanel account(s). Click List Accounts

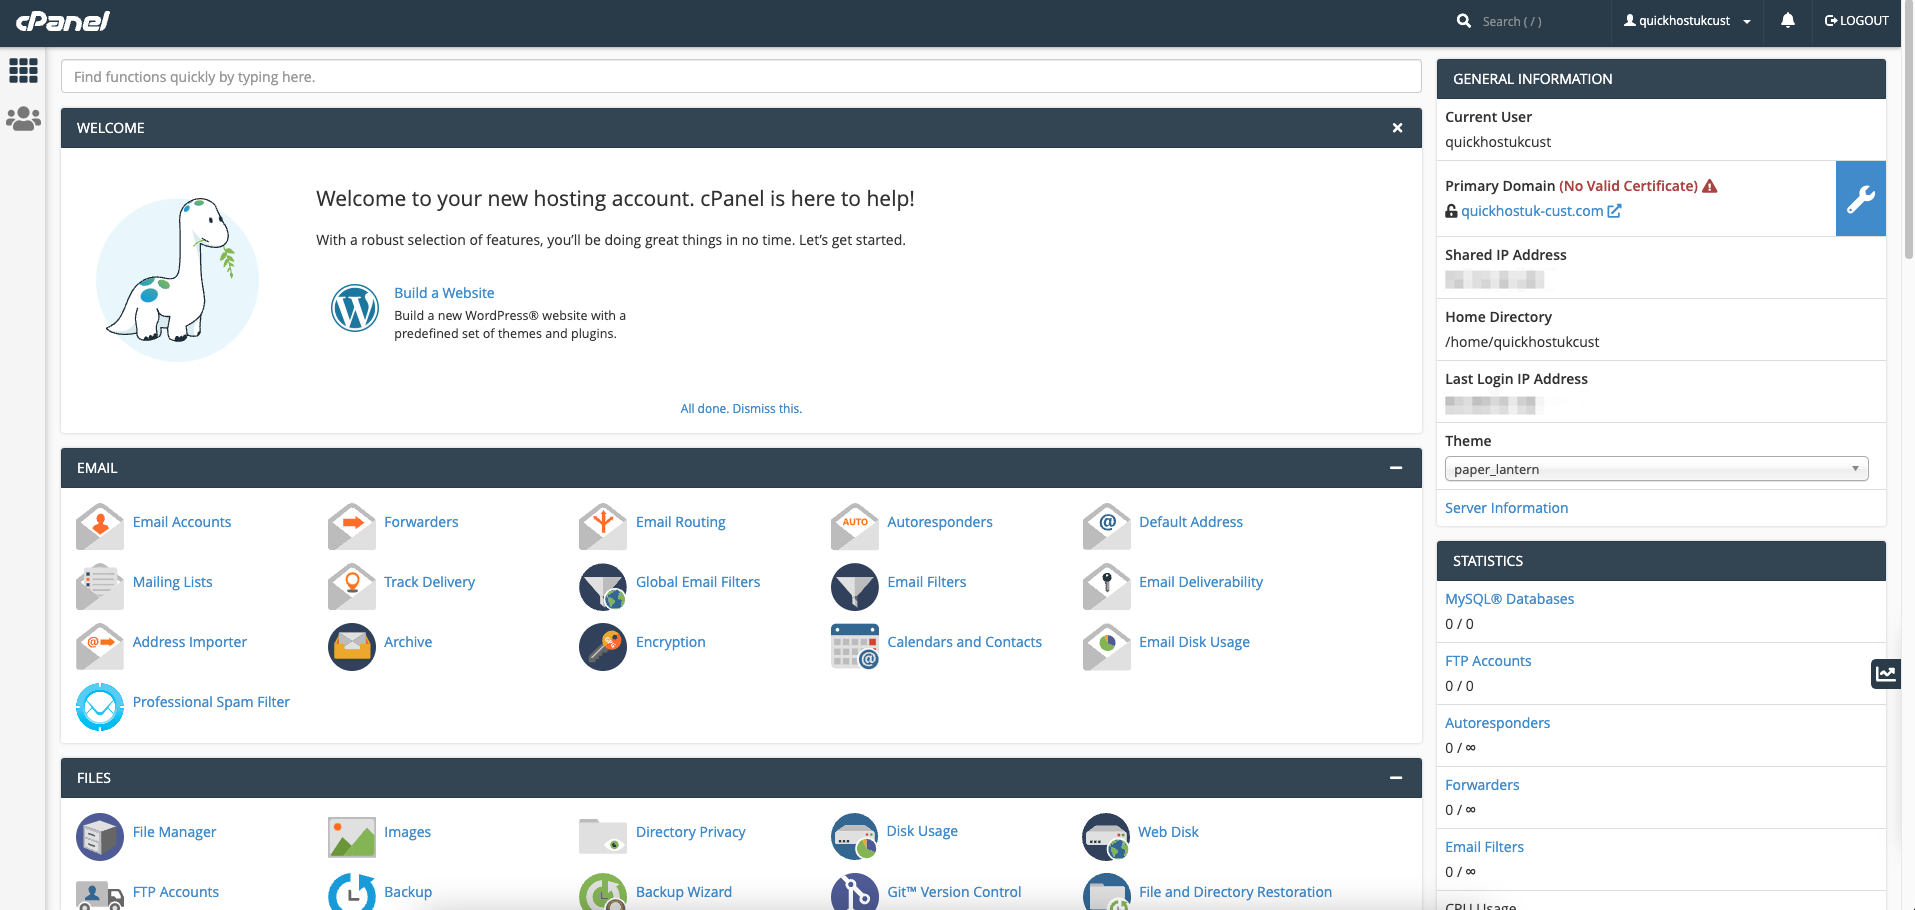
From here we can see all of our cPanel hosting accounts. Click the orange cPanel (CP) logo to log in to the cPanel account.
From the cPanel account, you or your customer can manage the web hosting account:
Plesk (Linux & Windows)
From your QuickHostUK account, click Services > Plesk Reseller Unlimited > Login to Plesk
Once logged into Plesk, the first thing to do is create a Service Plan:

You can create as many plans as you need. Click Add a Plan

On this page we can set the package limits:
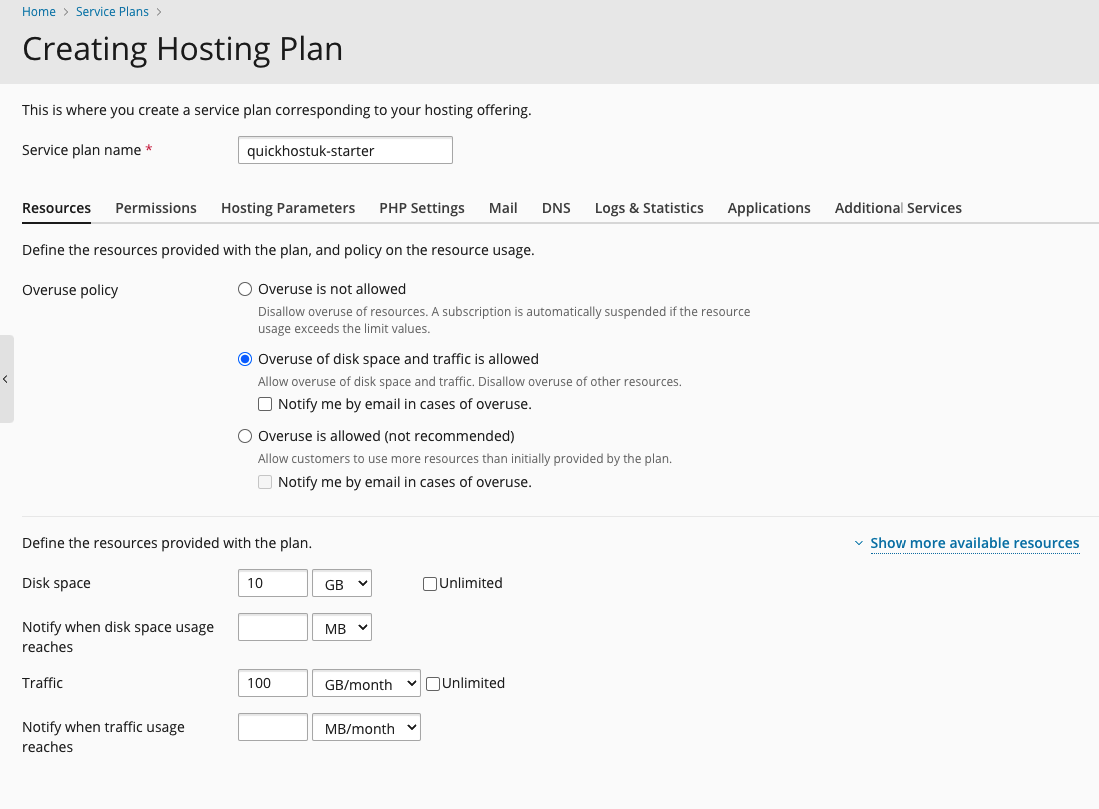
The available options are:
- Resources
- Overuse is not allowed
- Disallow overuse of resources. A subscription is automatically suspended if the resource usage exceeds the limit values.
- Overuse of disk space and traffic is allowed
- Allow overuse of disk space and traffic. Disallow overuse of other resources.
- Overuse is allowed (not recommended)
- Allow customers to use more resources than initially provided by the plan.
- Disk space
- Traffic
- Domains
- Subdomains
- Domain aliases
- Mailboxes
- Mailbox size
- Mailing lists
- Additional FTP accounts
- Databases
- Expiration date
- WordPress Websites
- Number of WordPress sites that can be installed and managed via WordPress Toolkit
- WordPress Backups
- Number of backups that can be created for each WordPress site in WordPress Toolkit
- WordPress websites with Smart Update
- How many WordPress websites can use Smart Update feature.
- Overuse is not allowed
- Permissions
- Hosting Parameters
- PHP Settings
- DNS
- Logs & Statistics
- Applications
- Additional Services
When done, click Add
You can now add a new customer and assign the new package to them:

Enter all the needed detail for the account, such as domain name, password, and the account holders email address:

From here we can see all of our Plesk hosting accounts. Click the Manage in Customer Panel link to log in to the Plesk account.
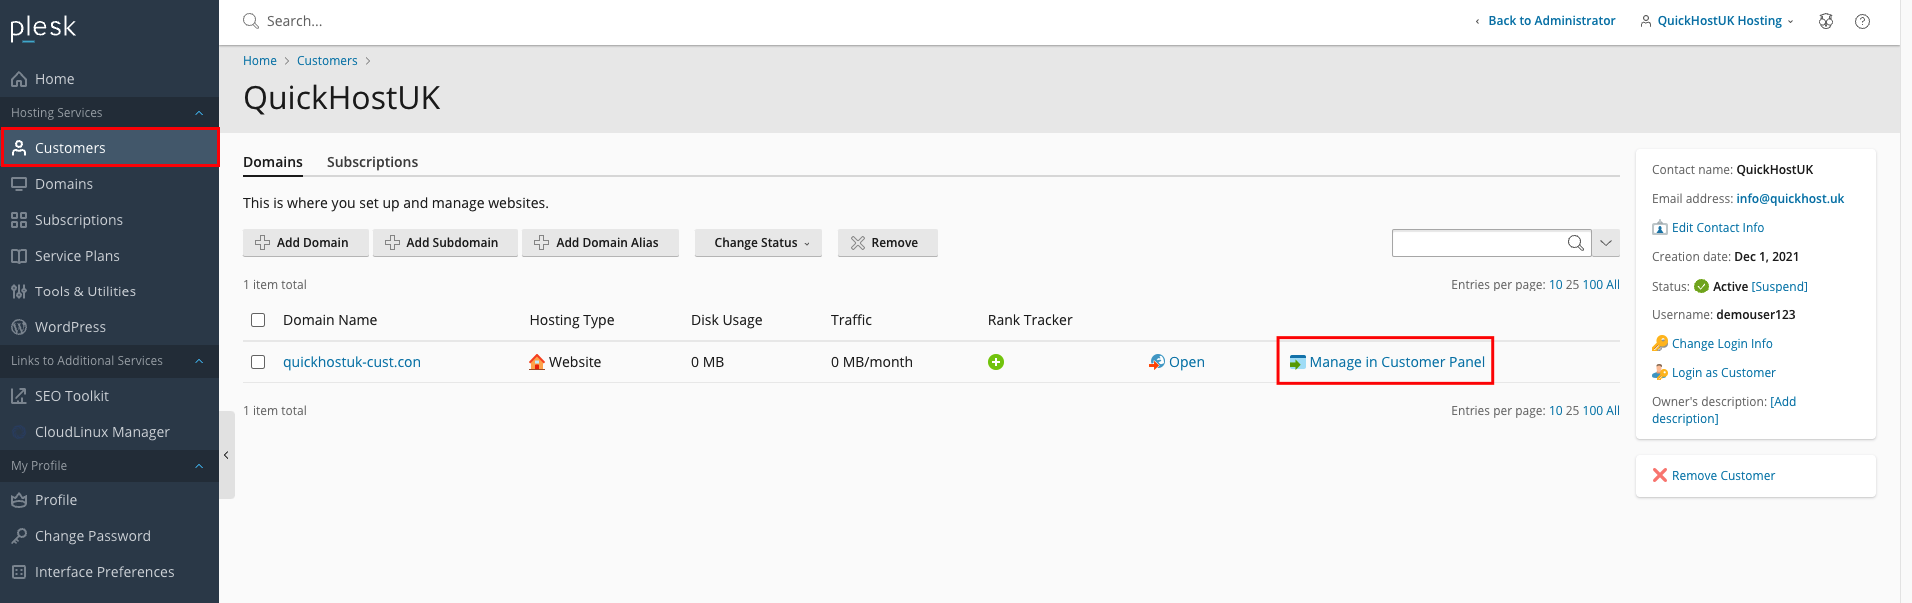
From the Plesk account, you or your customer can manage the web hosting account:

WHMCS Web Hosting Automation
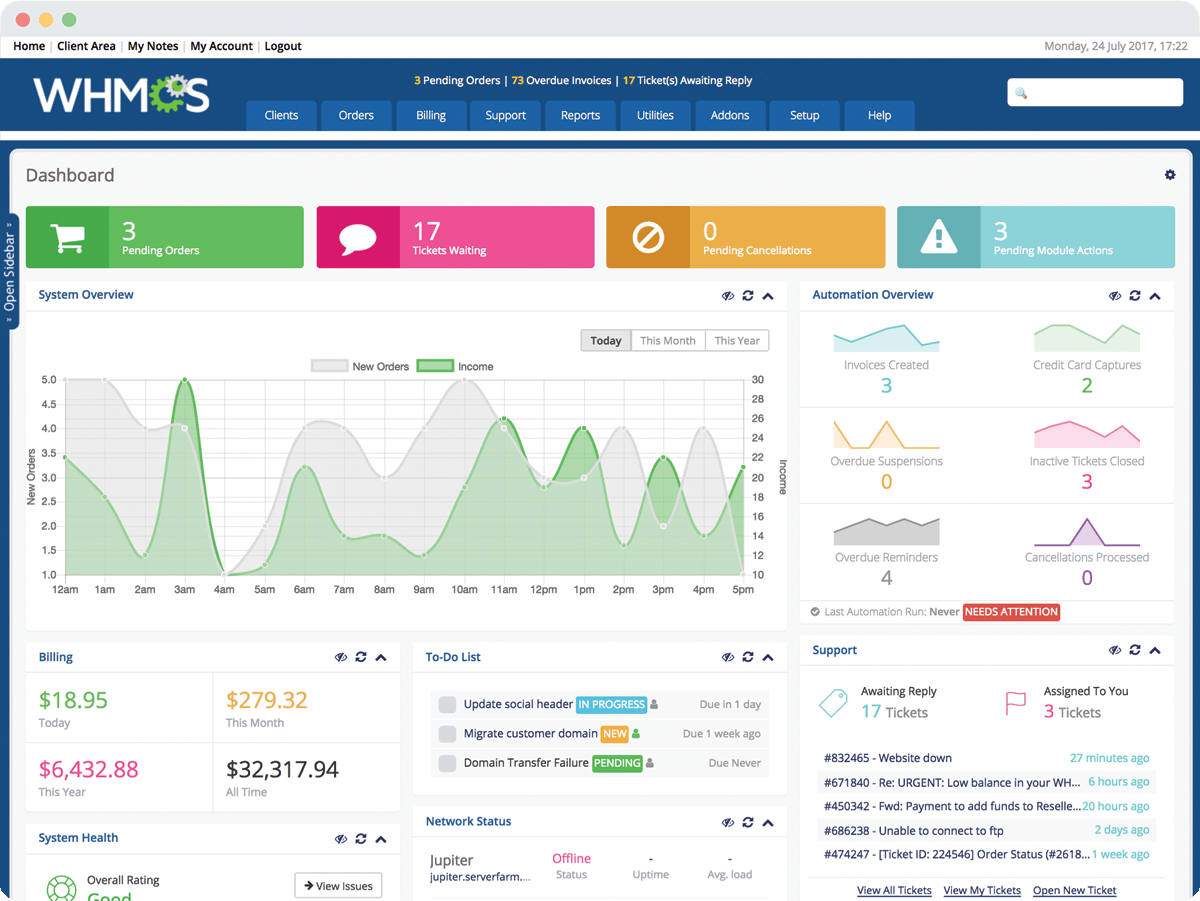
WHMCS is an automation platform that simplifies and automates every aspect of running a web hosting and domain registrar company online.
You can read our previous blog on why WHMCS is a good choice for web hosting and resellers.
- Save Time
WHMCS automates things for you so you don’t have to, saving you time and money. - Automate Billing
With WHMCS, you can send invoices, collect payments, collect taxes, send reminders, and more. - Web & Domains
All major web hosting control panels and domain registrars are integrated for automatic provisioning and management. - Support Tools
Support tools such as ticketing, knowledge bases, downloads and more are integrated into the client portal. - Developer Friendly
Modular, extensible, and well documented APIs make developing with and customizing WHMCS easy. - Secure & Scalable
WHMCS is a dependable, scalable and secure solution designed for businesses of all sizes and backed by an amazing support team.
Installing WHMCS
The first step is to install WHMCS.
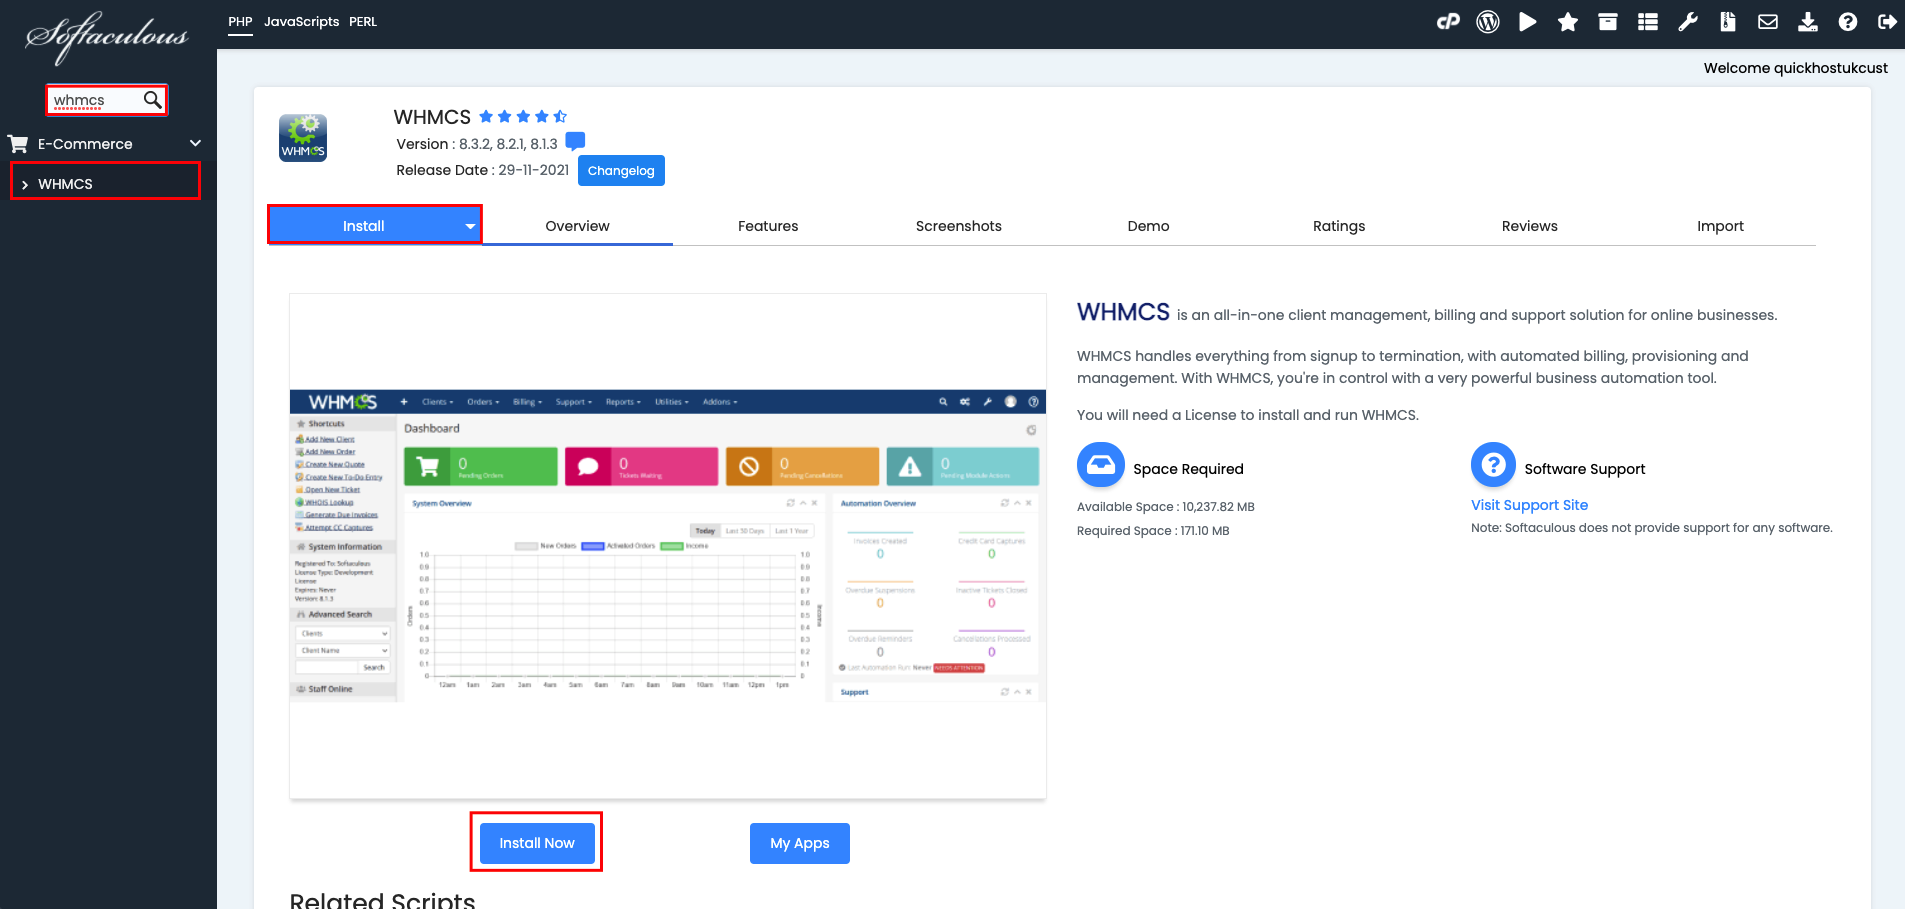
Using the steps above, create a new hosting account to host your WHMCS installation. Once done, enter the hosting panel and click the Sofaculous App Installer

Search for WHMCS and click Install Now
On the next page, complete all required information such as HTTP or HTTPS and the domain name and take note of the In Directory box.
If anything is entered into the In Directory box, you will need to access WHMCS like so: https://example.com/exampledirectory
When you are ready, click Install

You can now access your WHMCS on the URL entered during the installation.
Add a cPanel server to WHMCS
Create API Token
Before you can add our cPanel servers to your WHMCS for auto account creation, you must create an API token.
First, head over to your WHM and search for API, then click Manage API Tokens. Enter a name for your token and click Save.

Add a server to WHMCS
Next, in your WHMCS Go to Configuration () > System Settings > Products/Services > Servers.
- Click Add New Server.
- Enter our server’s details into the required fields including the API token.
- Click Test Connection. This ensures that WHMCS can successfully connect to this server. After testing, the server configuration page will appear.
- Add more information according to your requirements. For more information, see below.
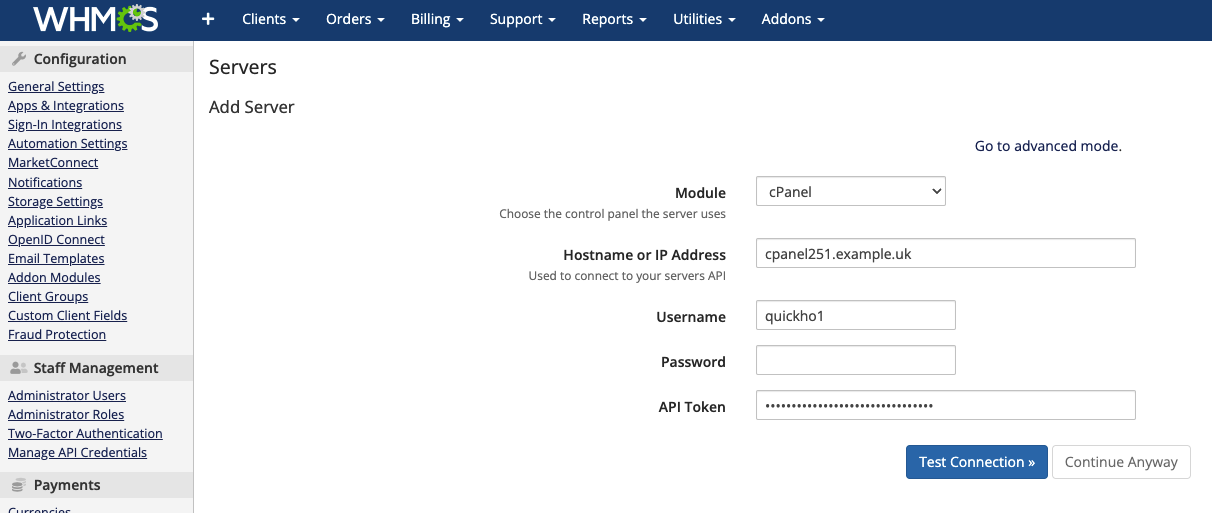
Note: Your username, server name / IP will be provided in your welcome email.
Now that your WHMCS can talk to our cPanel servers, it’s time to set up some products.
Add products to WHMCS
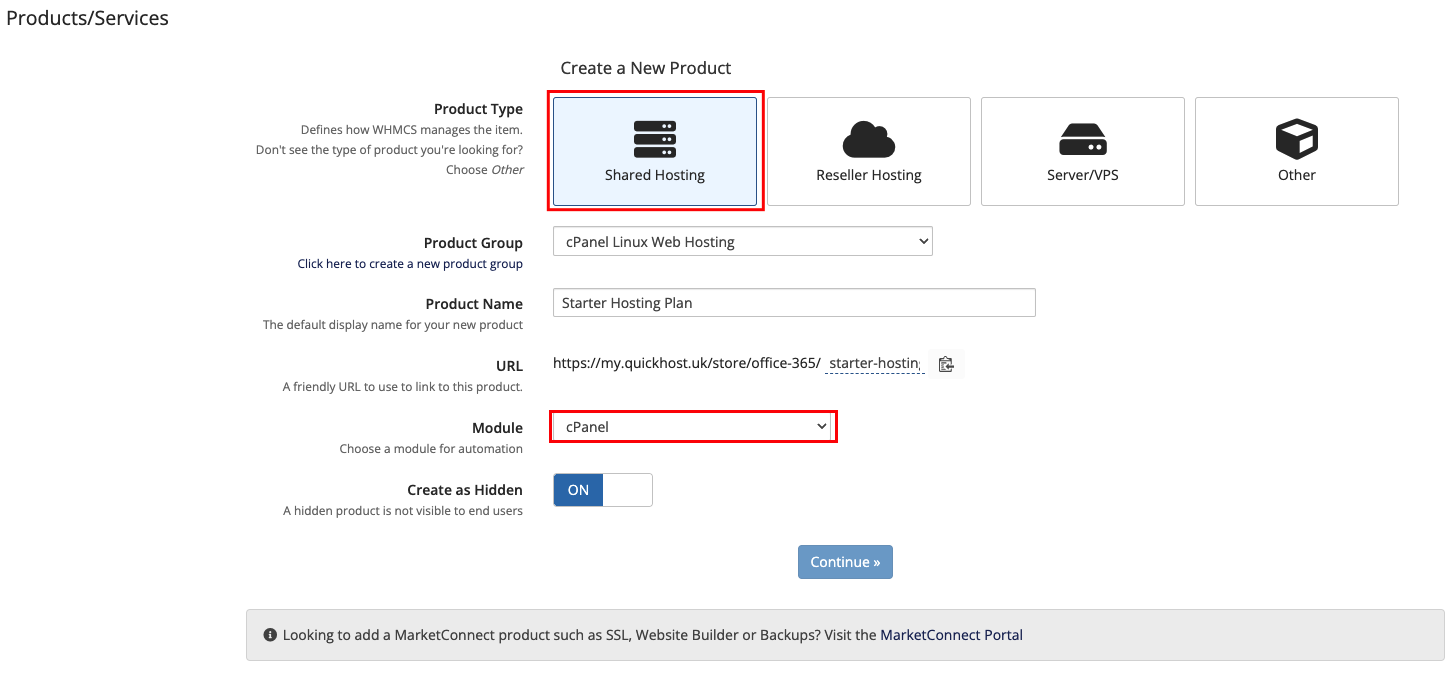
You can configure products at Configuration () > System Settings > Products/Services
Select Shared Hosting as the type and cPanel as the module:
Next, switch to the Module Settings tab and sync the WHM Package Names to see the packages you created earlier.
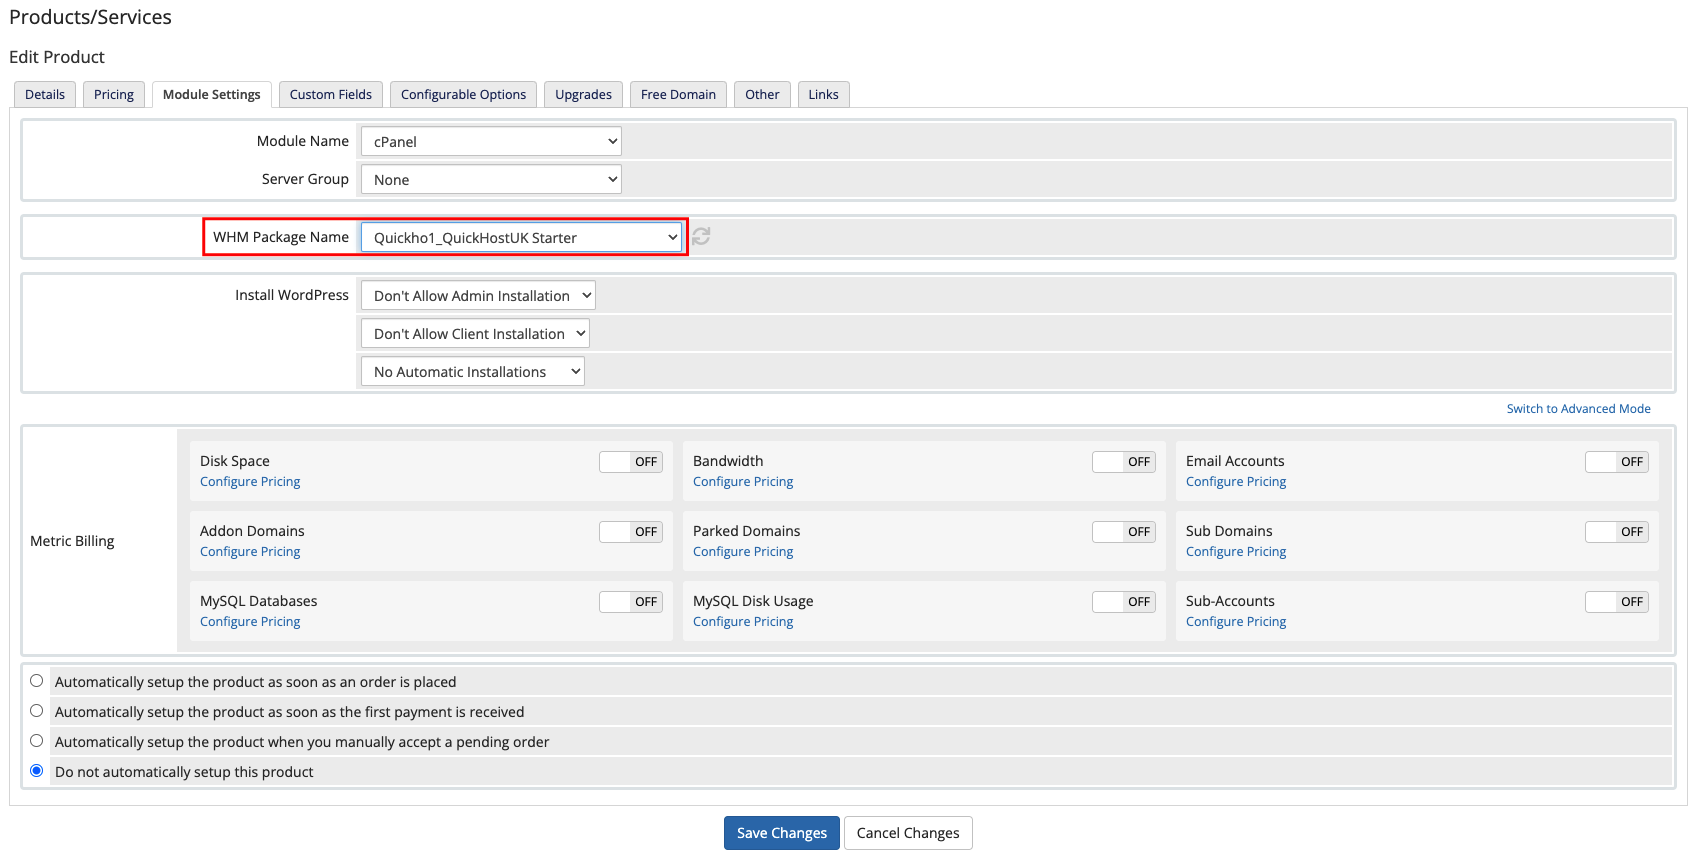
Save any changes and continue to set up the product prices etc.
That’s it! You can now automatically sell cPanel hosting accounts from your WHMCS.
Add a Plesk server to WHMCS
Add a server to WHMCS
Next, in your WHMCS Go to Configuration () > System Settings > Products/Services > Servers.
- Click Add New Server.
- Enter our server’s details into the required fields including your reseller username and password.
- Click Test Connection. This ensures that WHMCS can successfully connect to this server. After testing, the server configuration page will appear.
- Add more information according to your requirements. For more information, see below.

Note: Your username, server name / IP will be provided in your welcome email.
Now that your WHMCS can talk to our Plesk servers, it’s time to set up some products.
Add products to WHMCS
You can configure products at Configuration () > System Settings > Products/Services
Select Shared Hosting as the type and Plesk as the module:
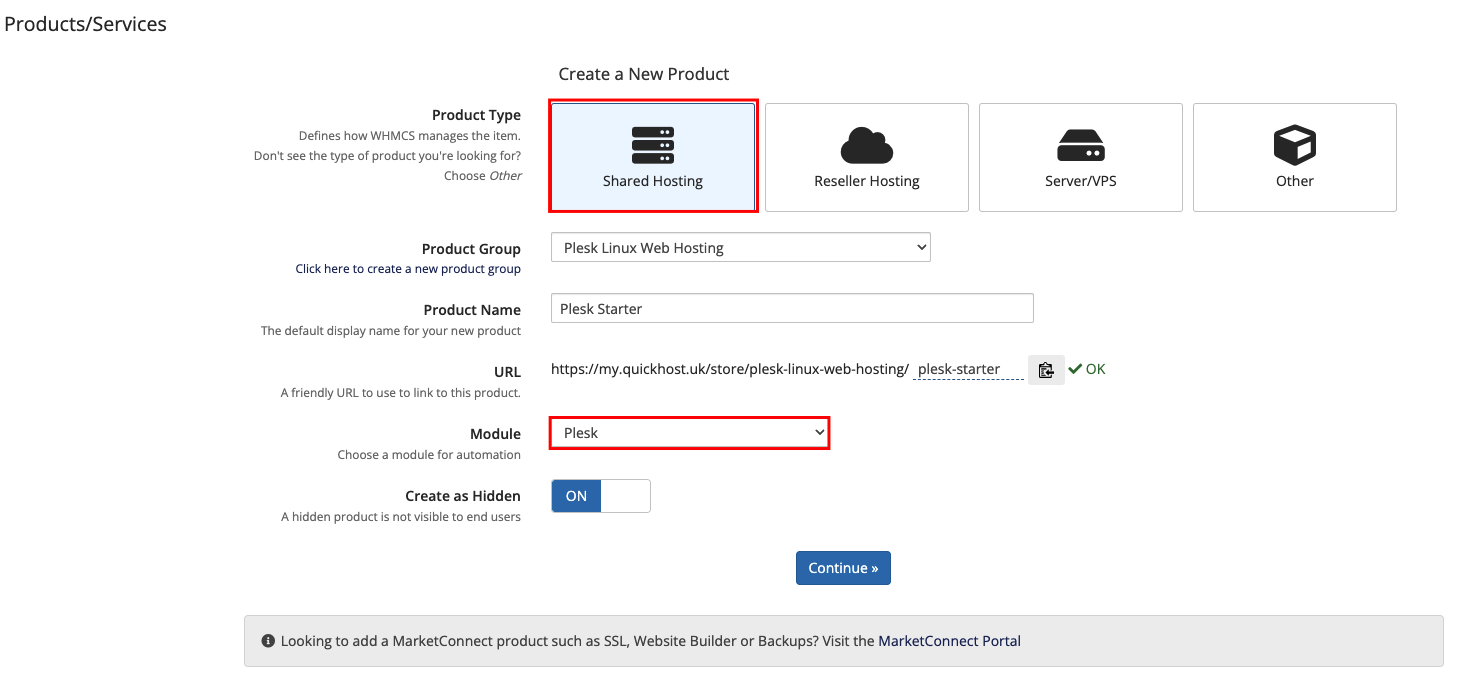
Next, switch to the Module Settings tab and sync the Service Plan Names to see the packages you created earlier.

Save any changes and continue to set up the product prices etc.
That’s it! You can now automatically sell Plesk hosting accounts from your WHMCS.
Related Articles...
